
Using the ND acquisition panel
This page describes how to use the ND acquisition panel to set up more complex imaging, including multiple channels and timelapse movies. If you are planning to acquire an image with just a single frame and a single channel, see instructions on Acquiring a single image.

Basic instructions:
- Check that the channels you want to image has been set up correctly by following the instructions Changing optical configurations and Refining the perfect focus. Test that these settings give you the correct image by using live view and cycling through each channel.
- For each acquisition type (i.e. timelapse, z-stack, channels) you wish to acquire, make sure that the corresponding tab has been checked. Every other tab should be unchecked.
- Check that the settings in each acquisition type has been set correctly.
- To save the image to file, make sure the box next to “Save to File” is checked. Change the output path and filename as appropriate.
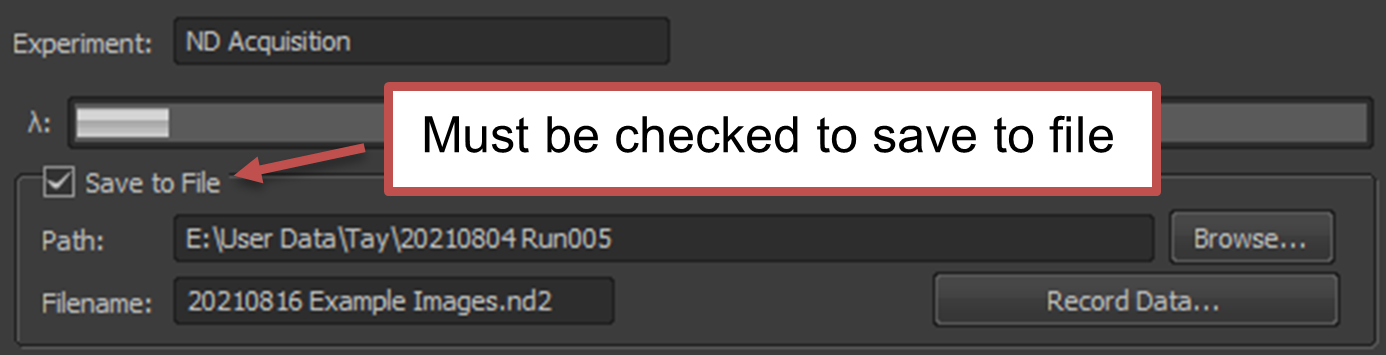
We suggest:- Output directory: Save your images under the folder that corresponds to your lab PI. If the folder doesn’t already exist, you can create it. Create a new subfolder with your name.
- Filename: Label images with the acquisition date and a short description, e.g. “20210816 HeLa Treated”.
- Write down all settings with the same heading in your lab notebook.
- Acquire the image(s) by clicking on “Run now”.

Acquiring multiple fluorescence channels
- First, make sure that the optical configuration has been set correctly for each channel that you intend to acquire by following the instructions under Changing optical configurations.
- Follow the protocol for using live view or acquiring a single image to change the optical settings.
- Alternatively, if you already know the correct settings (e.g. from a previous experiment), click on each optical configuration and adjust the setting. Make sure to click on the
 button to save the settings on each channel.
 - Check that the optical configurations are as you expect by cycling through the channels WITHOUT turning on the acquisition. Making sure you have the correct settings now will save you time later.
- Set up the ND Acquisition:
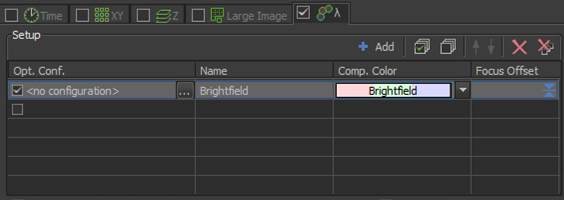
- Click on the checkbox next to the λ tab
 .
. - If there are optical configurations in the list below, click on the
 button to clear them
 - Add each channel to the acquisition by:
- Clicking on the
 button
 - Click on the … button next to the channel name under the “Opt. Conf.” column. Select the optical configuration that you want to capture, then click OK.
- Check that the channel has a check mark next to it (you can skip a channel by clearing the check mark).
- Channels will be acquired from top to bottom. To change the order, select the channel and use the arrows to move them up or down.
- Clicking on the
- Click on the checkbox next to the λ tab
- If you are using the perfect focus system, make sure that the Use PFS button is checked


Setting up a Time-Lapse movie
- In the ND Acquisition panel, check the box next to the Time tab.
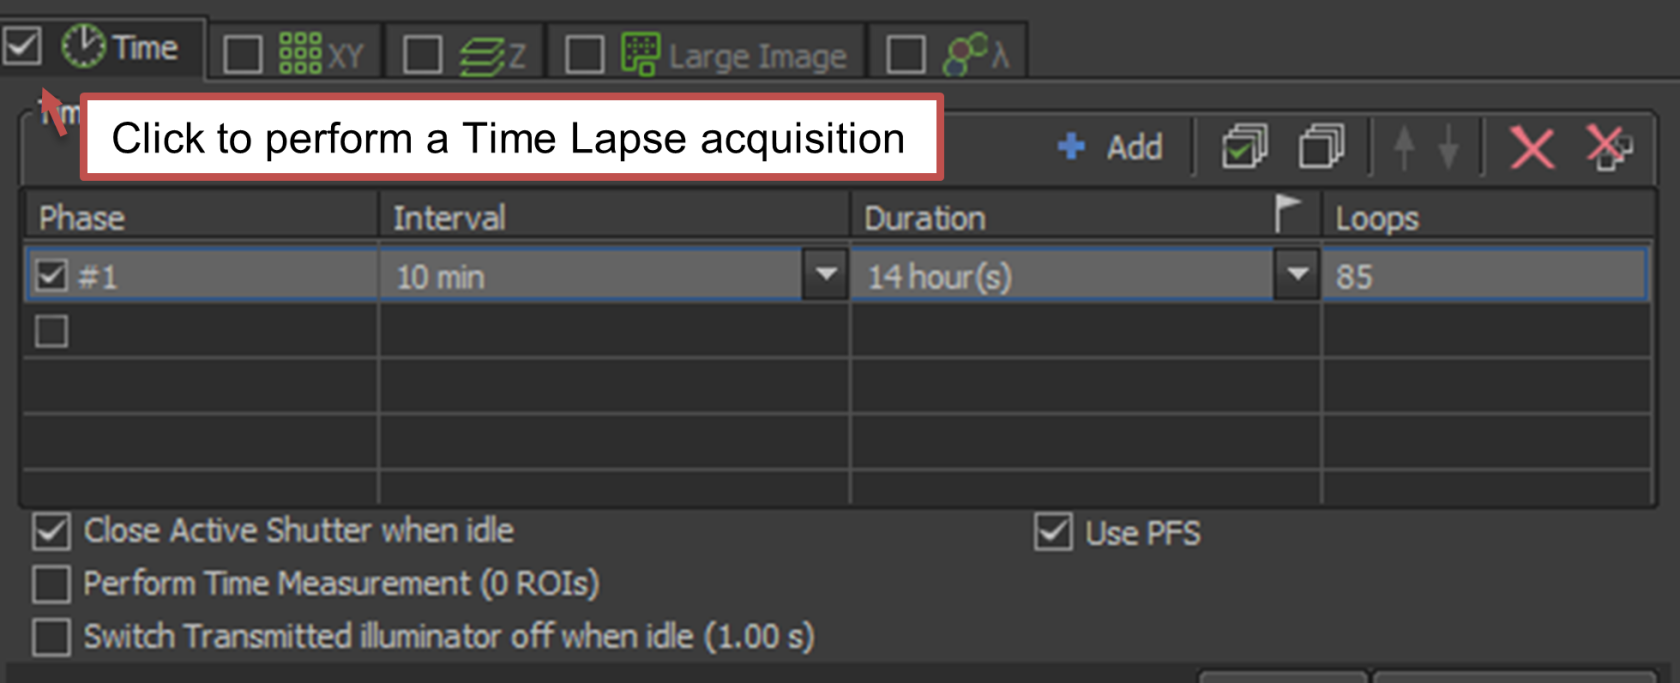
- If there are time-lapse settings, click on the button to clear them
- Add a new Phase to the acquisition by clicking on the button
- Enter your values for the Interval, Duration and Loops:
- Interval = the amount of time between each acquisition
- Duration = the total length of time for the imaging
- Loops = the number of images that will be acquired during the time-lapse
Note: Only 2 out of 3 settings need to be entered, and the remaining setting will be calculated. For example, if you enter the Interval and the Duration, the number of loops will be automatically determined.
- Interval = the amount of time between each acquisition
- If you are using the perfect focus system, make sure that the Use PFS button is checked
- Check the box next to “Close Active Shutter when idle”. This turns off the excitation light between acquisitions so that you do not damage your sample.
Setting up a Z-stack
- In the ND Acquisition panel, check the box next to the Z tab.
- Select one of the three buttons to set up a Z-stack.
 Top and Bottom
Note: This option works best when not using PFS
- Raise the objective to the top of your sample and select Top to set the maximum z value
- Lower the objective to the bottom of your sample and select Bottom to set the minimum z value
- Set the z Step size (in µm) or the number of Steps. The optimal z Step size is indicated to the right of the Step value (e.g., 0.6 µm in the image above). You can either manually enter this value or click on the < button to set this height.
 Define the Middle and move equal distance above and below

Note: This option works best with Perfect Focus
- Raise the objective to the middle focal plane of your sample
- Select “Home” then “Relative”
- Define two out of the following three parameters: Step size, number of Steps or Range
Note: The optimal z Step size is indicated to the right of the of the Step value (0.6 µm in the image above). You can either manually enter this value or click on the button to set this height.
 Define a 0 position and move unequal distances above and below

This option works best with Perfect Focus
- Raise the objective a focal plane within your sample
- Select “Home” then “Relative”
- Define the distance Below and Above the defined plane to be imaged
- Define either the Step size or the number of Steps
Note: The optimal z Step size is indicated to the right of the of the Step value (0.6 µm in the image above). You can either manually enter this value or click on the button to set this height.
Setting up a Multipoint Acquisition
- In the ND Acquisition panel, check the box for Multipoint Acquisition (XY).
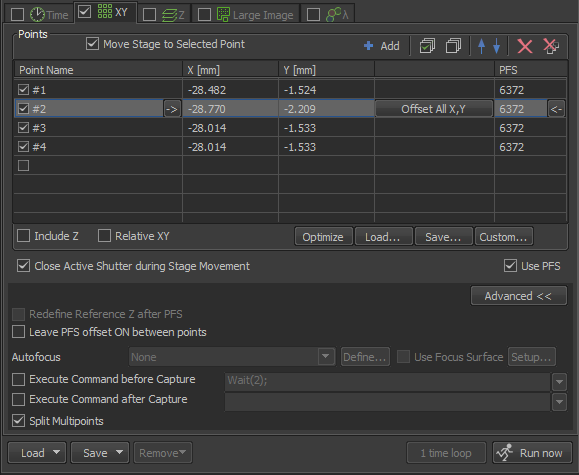
- If there are positions listed, click on the button to clear them
- You can choose to include the Z position by selecting the “Include Z” box
- If you are not using the PFS, it is recommended that you include z
- If you are using the PFS, you typically do not include z
- Move the stage to a desired XYZ position
- Add the position to the acquisition by clicking on the button
- If you are using the perfect focus system, make sure that the Use PFS button is checked
- Be sure to select “Close Active Shutter during Stage Movement”. This turns off the excitation light between positions so that you do not damage your sample.

No Comments