
Changing the optical configuration
The following sections describe the different settings that can be changed for each channel. These parameters are saved independently for each channel.
Changing channels
- Select the desired optical configuration by clicking on the button in the OC Panel. The button will appear depressed when selected. You will hear the microscope change filter cubes. Wait until the sound stops before proceeding.
 Changing illumination intensity
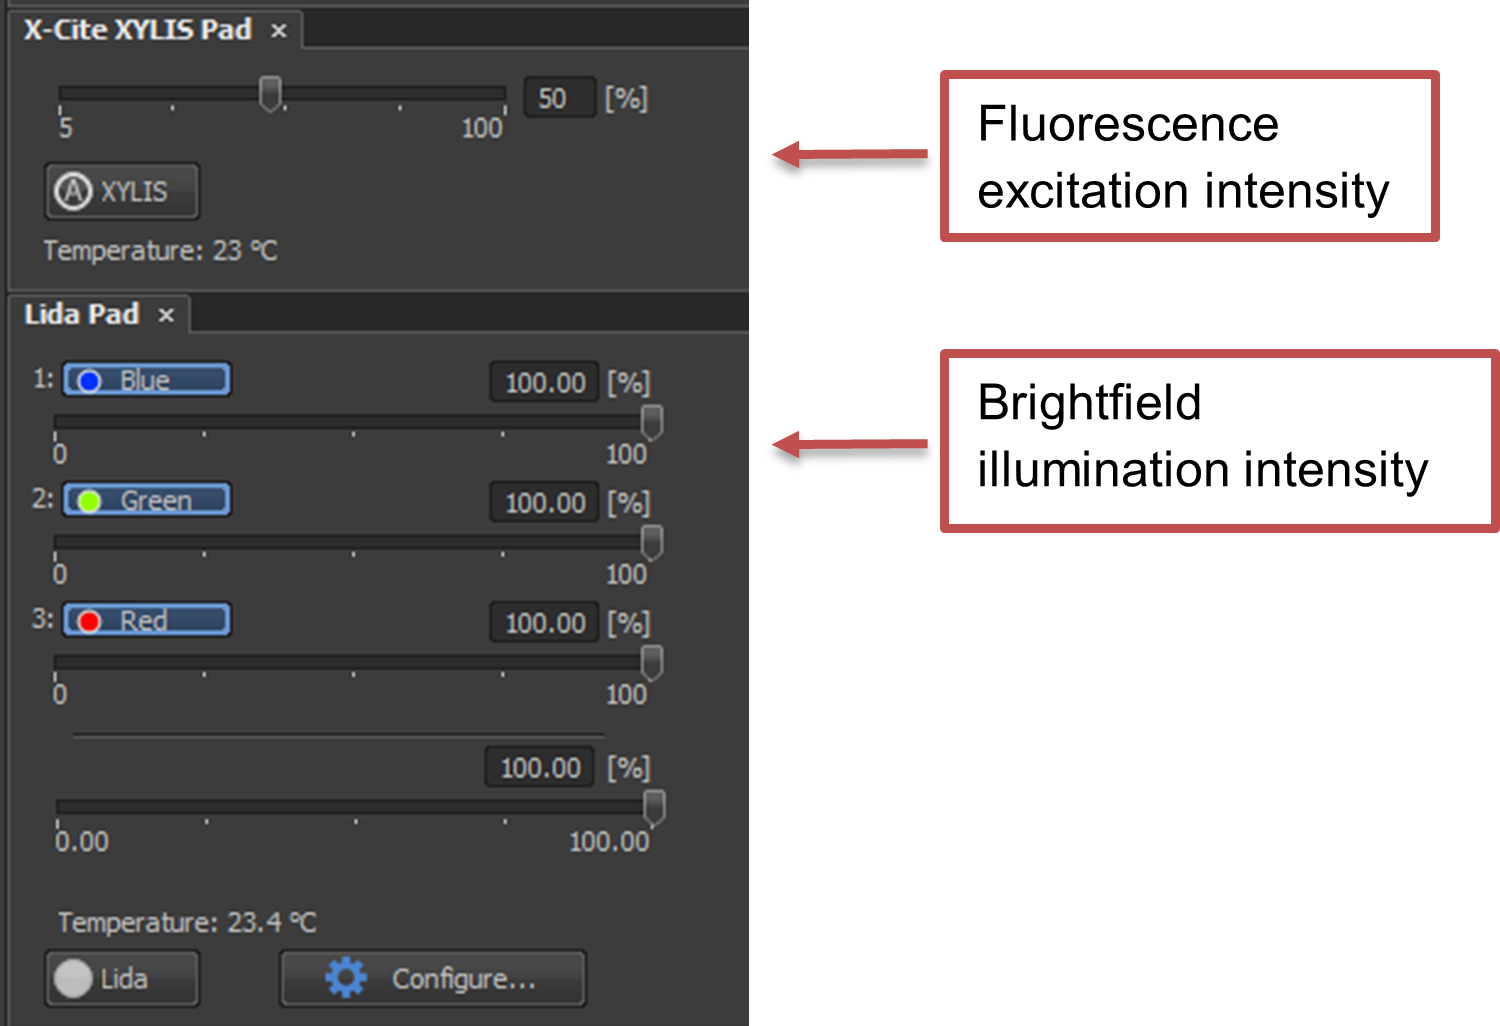
- Adjust the illumination intensity:
- For fluorescence: Change the intensity by moving the slider under the X-Cite XYLIS pad. For live cells, use a low intensity (~10%) to start to avoid killing the cells.
- For brightfield: Change the intensity (and color) by changing the sliders under the Lida Pad (and selecting or deselecting the Blue, Green, Red buttons)
- If you changed the optical configuration in Step 3 or 4, make sure you SAVE the settings by clicking on the
 button next to the optical configuration.

Changing acquisition parameters
Acquisition can be changed using the Flash4.0 Settings panel.

- Adjust the exposure time to change the amount of signal that you observe. A higher exposure time means the sample will be exposed for longer, increasing the signal. The
 button will set the exposure to 1 frame (usually 33 ms).
 - The camera pixels can be binned (merged) to increase the signal (see Binning). "Format For Live" sets the binning during Live view and "Format For Capture" sets the binning during acquisition. Generally, both of these should be set to the same setting for consistency.

Binning
Binning combines multiple pixels together to create a "superpixel". This has the advantage of effectively increasing the size of the pixel, which has increased sensitivity compared to a single pixel. However, the disadvantage is that the binned pixels final image resolution which could lead to pixelation of the final image.
Saving the optical configuration
Whenever there are unsaved settings, an exclamation mark (!) appears next to the optical configuration. These changes will be lost if you start an acquisition or if you change the optical configuration.

To save your changes, click on the  button next to the optical configuration.
Checking for saturation
Pixel saturation occurs when the intensity arriving on the camera is too high to detect. For the cameras in our core, this occurs when the pixel value increases beyond 65535 counts. The typical cause of saturation are incorrect acquisition parameters (i.e., the camera is set to bin or the exposure time is too long), or optical intensity is set too high.
To check for saturation:
- Look at the maximum display intensity value on the lookup table. If it reads 65535, then some of the pixels are saturated. Reduce the illumination and/or exposure settings until the maximum value is below ~60000 (this leaves a bit of room in case the fluorescence increases).
No Comments