Nikon Widefield
- Basic use
- Moving the sample
- Using the Perfect Focus System (PFS)
- Using Live View
- Changing the optical configuration
- Adjusting the lookup tables
- Acquiring a single image
- Using the ND acquisition panel
- Cleaning up
- Nikon Widefield Specifications
- Online learning resources by Nikon
Basic use
This protocol covers the basics of mounting your sample on the microscope and setting up the perfect focus.
- If the microscope is off, turn on the microscope following the protocol taped to the wall.
- Start Nikon Elements:
- Click on the icon on the desktop

- Click OK when the dialog box appears saying “Optical Configurations Import successfully finished.” Note: If an error occurs, please contact us as the optical configurations may be corrupted.

- You might hear a beep and the perfect focus button might be flashing. If this is the case, disengage the system by pressing the button on the microscope base.
- Turn on the internal lamp using the footswitch if you need light.

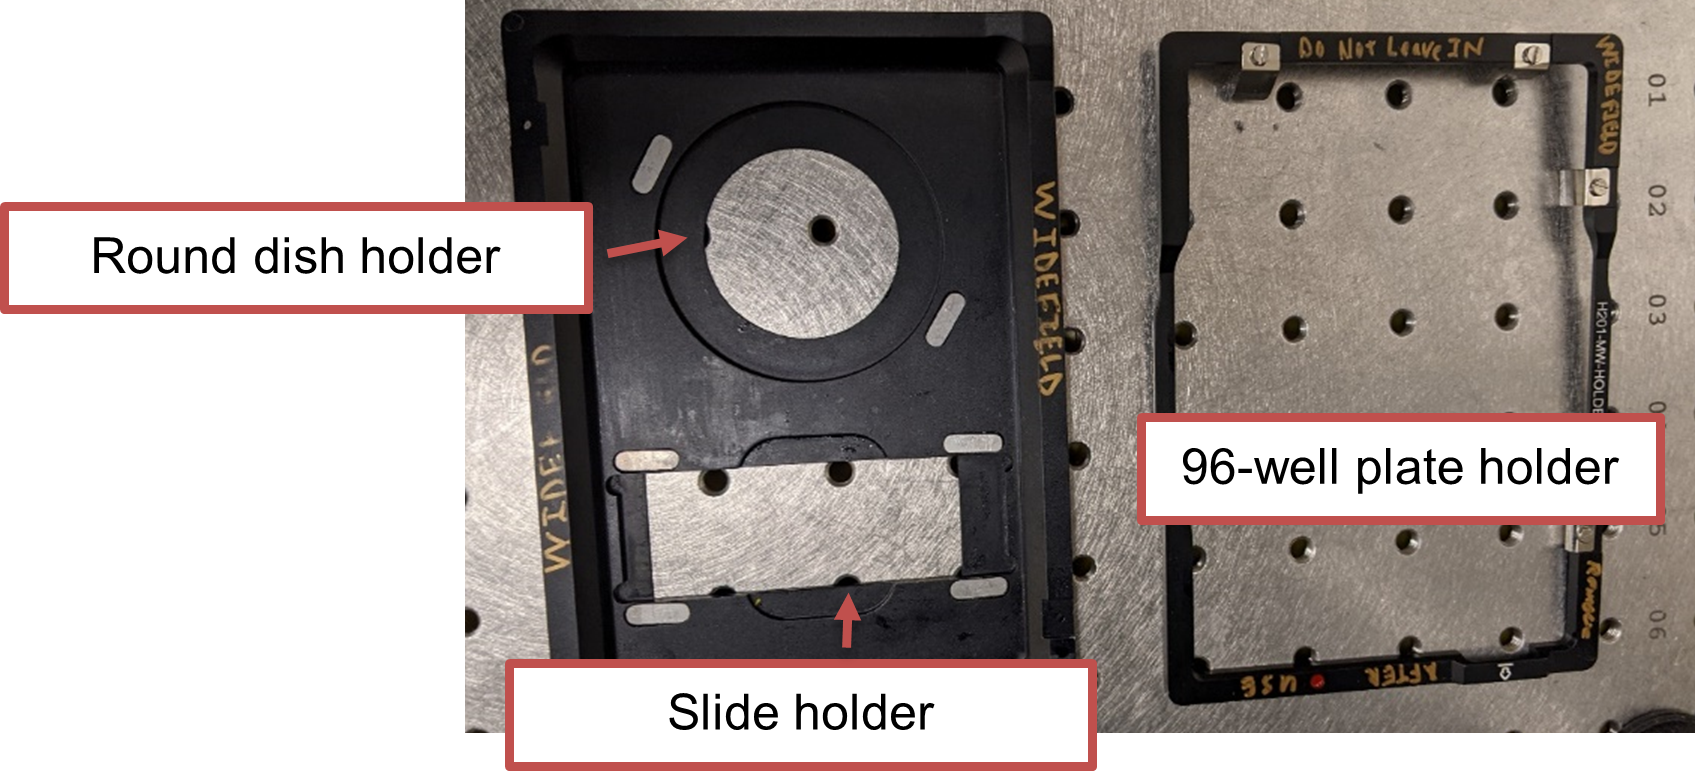
- Place the appropriate sample holder into the microscope chamber:
- Use the holder with the rectangle cutouts for slides
- Use the holder with the circular cutout for round dishes
- Use the plate insert for 96-well plates

- Select the appropriate objective in Elements by clicking on the corresponding button on the Macro Panel (left of the screen by default). Wait for the microscope to finish changing objective before moving on.
- Move the lens to be roughly at the center of the sample holder using the joystick.
- If your samples require heating, make sure the temperature controller is turned on and set to the correct temperature. Leave the system for at least 1 hour to allow temperature to equilibrate otherwise you will see significant sample drift over this time.
- Only if using 100x objective, add one drop of imaging oil. Important: DO NOT ADD OIL IF YOU ARE USING ANY OTHER OBJECTIVE AS THIS WILL DAMAGE THE OBJECTIVE.
- Place your sample on the holder with the cover slip facing down towards the objective.
- Engage the perfect focus system (PFS). See this page for more instructions.
- Once the PFS is engaged, turn on live mode.
- Refine the focus by adjusting the perfect focus offset using the Perfect Focus wheel.
- If using heating, check that cells are present, then leave for ~30 minutes to 1 hour if possible. Again, this will prevent sample drift.
- Acquire your images.
Moving the sample
The microscope contains a motorized stage which moves the sample. The stage is controlled using the joystick. The sections below describe how to move the sample in XY and Z directions.
XY position
The XY position of the stage can be controlled by using the joystick or by right-clicking on the image and selecting “Move this point to center”.
If you are using the joystick, the speed of the stage movement can be changed by either:
- Rotating the top of the joystick. This will change the stage speed from Coarse (Fastest) > Fine > Extra Fine (Slowest).
- The speed of the stage is also controlled by the angle of the joystick. Pushing on the joystick further moves the stage faster.

Z position
The position of the objective is controlled by the z-position of the microscope. This changes the focus of the sample.
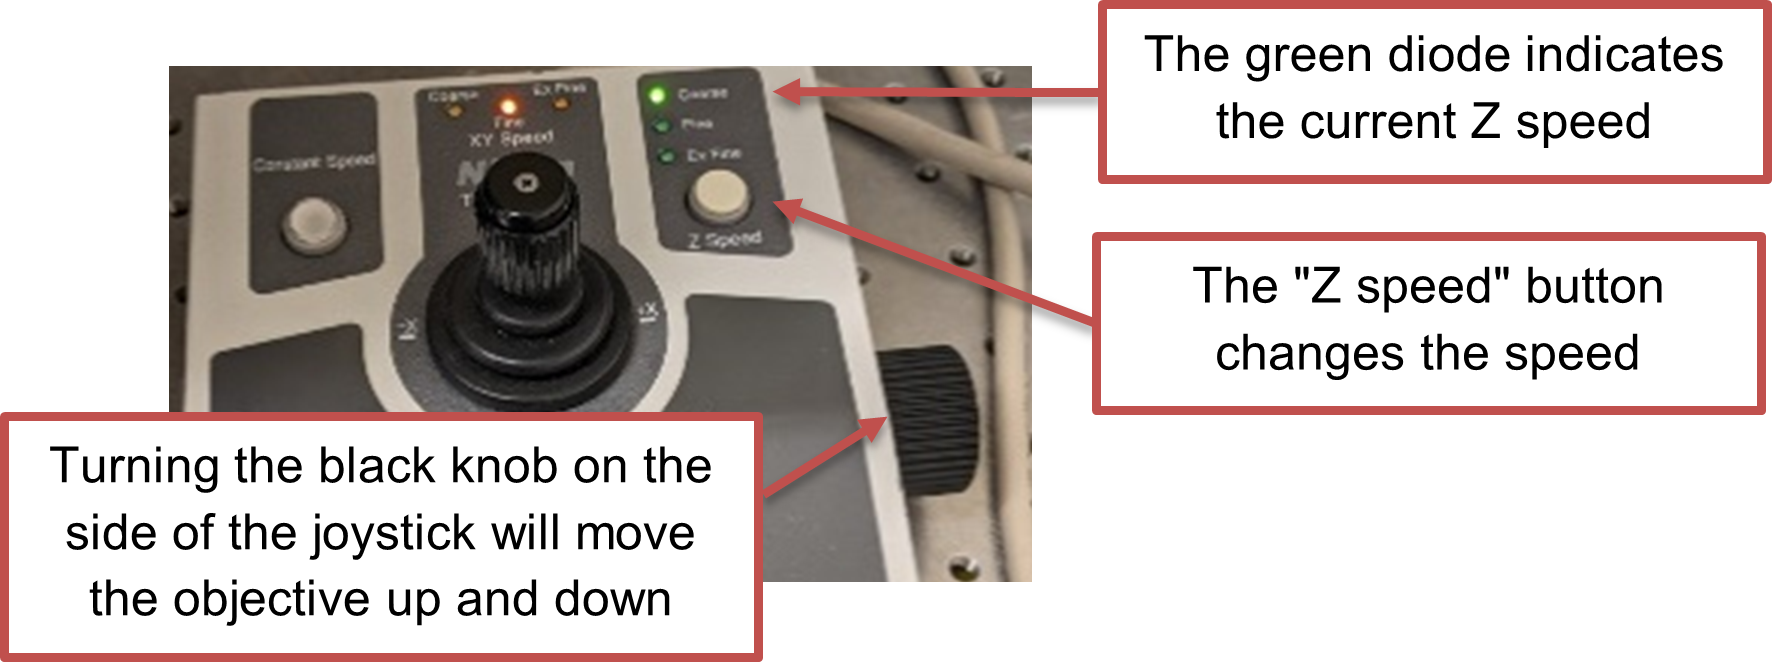
- The black knob on the right of the joystick will move the objective up and down.
- The speed at which the z-position changes can be controlled by pushing the "Z speed" button. This will change the z-position speed from Coarse (Fastest) > Fine > Extra Fine (Slowest).
- If the z-position does not change, check that the PFS is not engaged. To change the focus when the PFS is engaged, use the Perfect Focus wheel.
Using the Perfect Focus System (PFS)
The perfect focus system locates the coverslip and continually adjusts the objective height to follow any drift in the system.
Engaging the PFS
- Only if using the 100x oil objective, first raise the objective by turning the z-axis control until the oil contacts the sample. This step is not necessary for the air objectives.
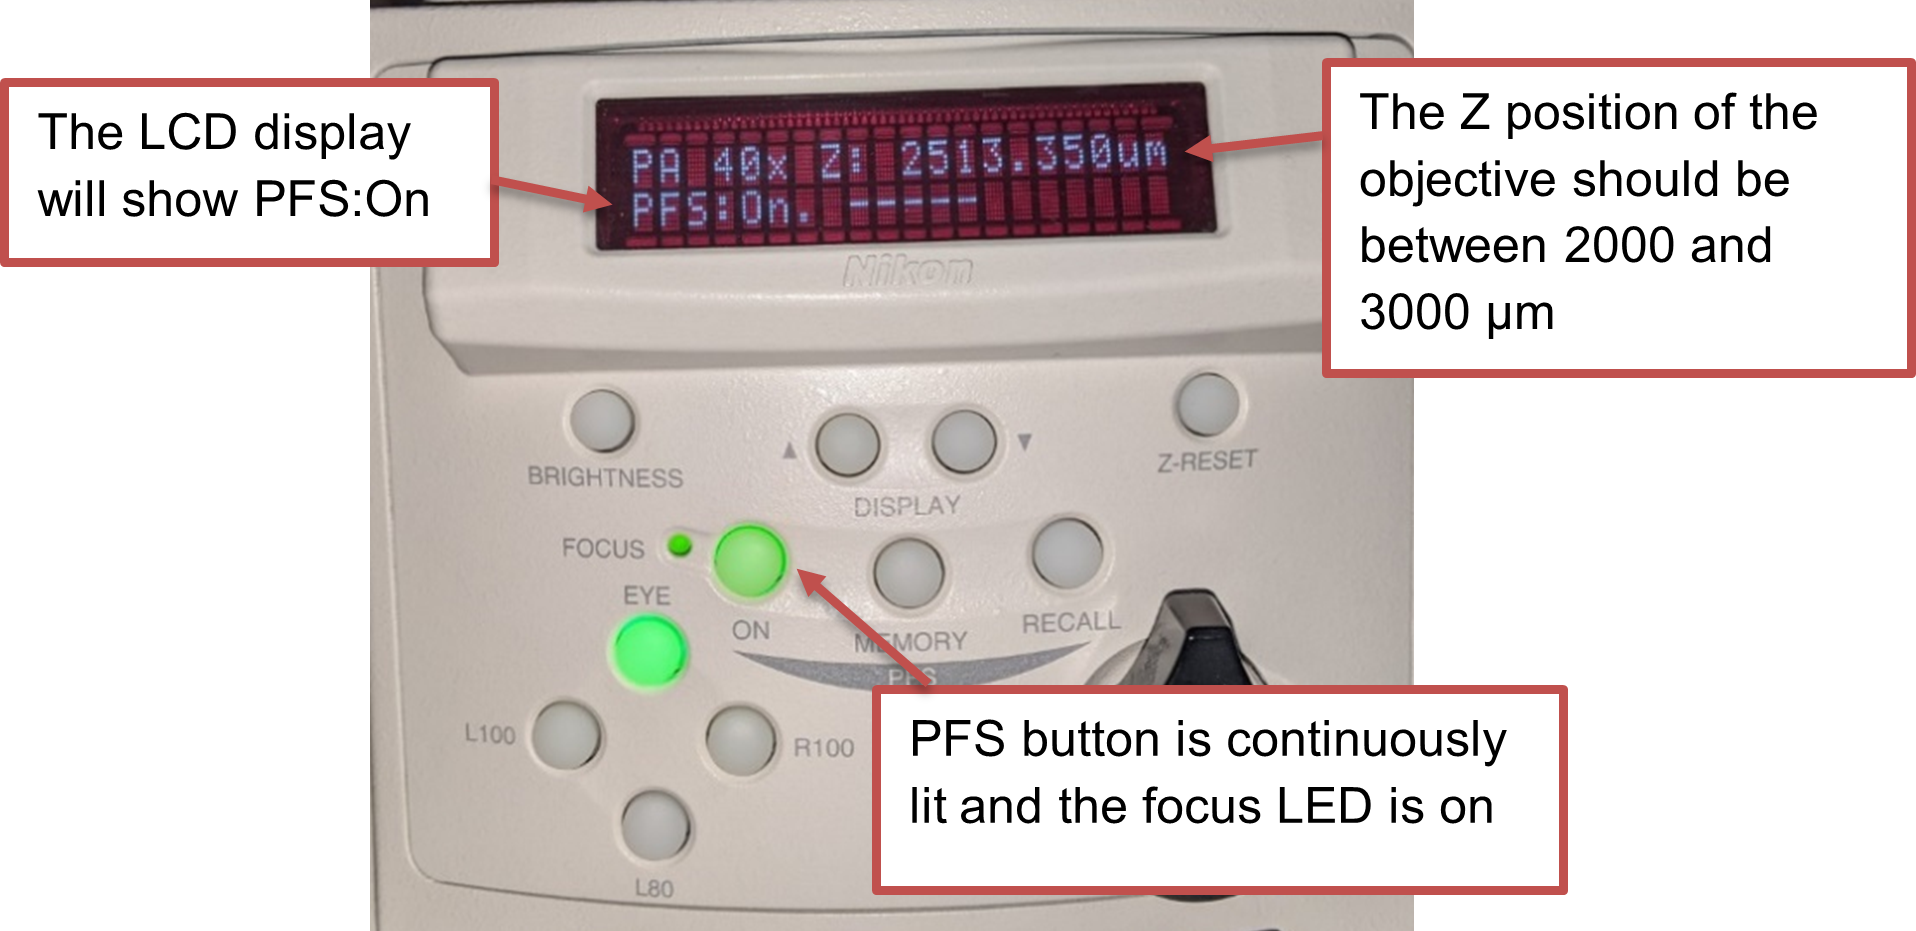
- Press the PFS button on the microscope base. You will hear several beeps and the light will start blinking, indicating that the microscope is searching for the focal plane.
- Raise the objective slowly until you hear a beep using the black knob on the right side of the joystick. The PFS button will be solidly lit when perfect focus is engaged correctly and the LED next to the FOCUS display will be lit. Be careful not to push the objective into your sample - this will damage the objective and lead to costly repairs.
- The display on the LCD screen on the microscope base indicates the Z position of the objective. The typical Z-position is between 2000-3000 µm.
- If you turn the knob the wrong way (i.e., lowering the objective), you might hear a continuous tone. This is fine - you just have to reengage the PFS system by pressing the button.
- If you are having trouble getting perfect focus to engage, see Troubleshooting Perfect Focus below.
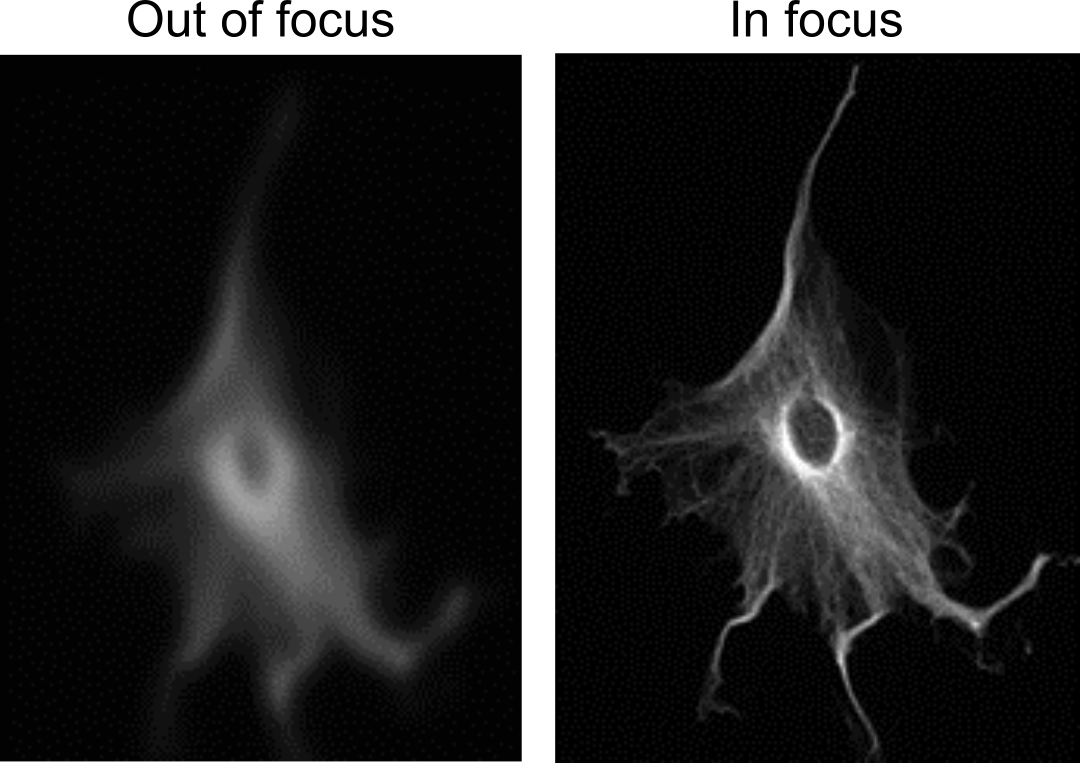
Refining the perfect focus offset
Once perfect focus is engaged, you cannot change the z-position of the microscope. However, to get cells in focus, you can change the perfect focus offset using the perfect focus wheel.
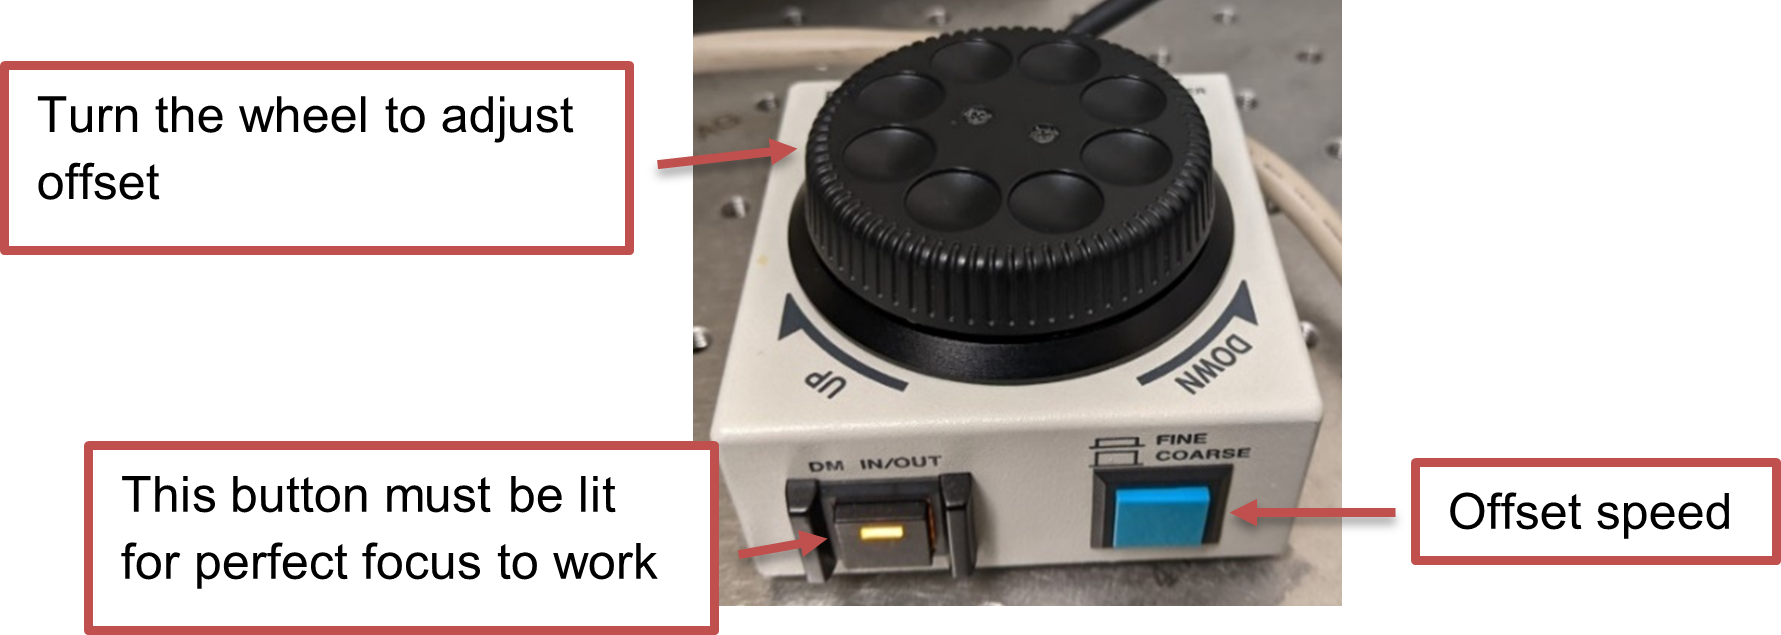
- Start Live View.
- Adjust the perfect focus offset by rotating the perfect focus wheel.
- The blue button can be used to change the offset change speed. When the button is pressed in, turning the wheel changes the offset a little bit. When the button is out, the turning the wheel changes the offset a lot. You should start with coarse adjustment until you start to see some cells, then switch to fine.
- When the cells are in focus, click on the
 button next to the selected optical configuration to save the settings.
Troubleshooting tips
- The perfect focus system looks for a reflection off the coverslip. This can be formed by a glass-air or a glass-water (e.g. sample mounted under an agar pad) boundary. If your sample is fixed with mounting media, the perfect focus will not work.
- Check that the coverslip is facing downwards towards the objective. The coverslip thickness should be no thicker than 1 mm.
- Are you using the correct objective? Did you add oil to an air objective or forget the oil for the 100x objective? If the latter is true, clean the oil off and let Joe know asap.
Using Live View
In live view, the microscope will continuously acquire images, allowing you to preview settings and focus the sample.
These are general instructions to use Live View mode:
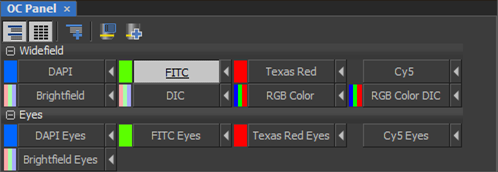
- Make sure an optical configuration is selected by clicking on the appropriate button in the OC Panel.
- Click on the
 icon on the main toolbar (under the menu) to start live view.
 - If the image appears black, adjust the lookup table.
- When you are in live view, you can change the position of the sample using the joystick, as well as changing optical and acquisition parameters (see Changing optical configuration).
- To stop live view, click on the
 button. You can save the last image collected in this mode by using File > Save As.


Use caution if imaging live cells
- With live view activated, the cells will be illuminated by near constant light. This can perturb the cells and cause them to change behavior or die. To avoid this, you should reduce the intensity as much as possible.
- You should also consider using one location to refine the perfect focus and adjust acquisition settings. Then move the stage to a different location before starting the actual imaging run.
Changing the optical configuration
The following sections describe the different settings that can be changed for each channel. These parameters are saved independently for each channel.
Changing channels
- Select the desired optical configuration by clicking on the button in the OC Panel. The button will appear depressed when selected. You will hear the microscope change filter cubes. Wait until the sound stops before proceeding.
 Changing illumination intensity
- Adjust the illumination intensity:
- For fluorescence: Change the intensity by moving the slider under the X-Cite XYLIS pad. For live cells, use a low intensity (~10%) to start to avoid killing the cells.
- For brightfield: Change the intensity (and color) by changing the sliders under the Lida Pad (and selecting or deselecting the Blue, Green, Red buttons)

- If you changed the optical configuration in Step 3 or 4, make sure you SAVE the settings by clicking on the button next to the optical configuration.

Changing acquisition parameters
Acquisition can be changed using the Flash4.0 Settings panel.

- Adjust the exposure time to change the amount of signal that you observe. A higher exposure time means the sample will be exposed for longer, increasing the signal. The
 button will set the exposure to 1 frame (usually 33 ms).
 - The camera pixels can be binned (merged) to increase the signal (see Binning). "Format For Live" sets the binning during Live view and "Format For Capture" sets the binning during acquisition. Generally, both of these should be set to the same setting for consistency.

Binning
Binning combines multiple pixels together to create a "superpixel". This has the advantage of effectively increasing the size of the pixel, which has increased sensitivity compared to a single pixel. However, the disadvantage is that the binned pixels final image resolution which could lead to pixelation of the final image.
Saving the optical configuration
Whenever there are unsaved settings, an exclamation mark (!) appears next to the optical configuration. These changes will be lost if you start an acquisition or if you change the optical configuration.

To save your changes, click on the  button next to the optical configuration.
Checking for saturation
Pixel saturation occurs when the intensity arriving on the camera is too high to detect. For the cameras in our core, this occurs when the pixel value increases beyond 65535 counts. The typical cause of saturation are incorrect acquisition parameters (i.e., the camera is set to bin or the exposure time is too long), or optical intensity is set too high.
To check for saturation:
- Look at the maximum display intensity value on the lookup table. If it reads 65535, then some of the pixels are saturated. Reduce the illumination and/or exposure settings until the maximum value is below ~60000 (this leaves a bit of room in case the fluorescence increases).
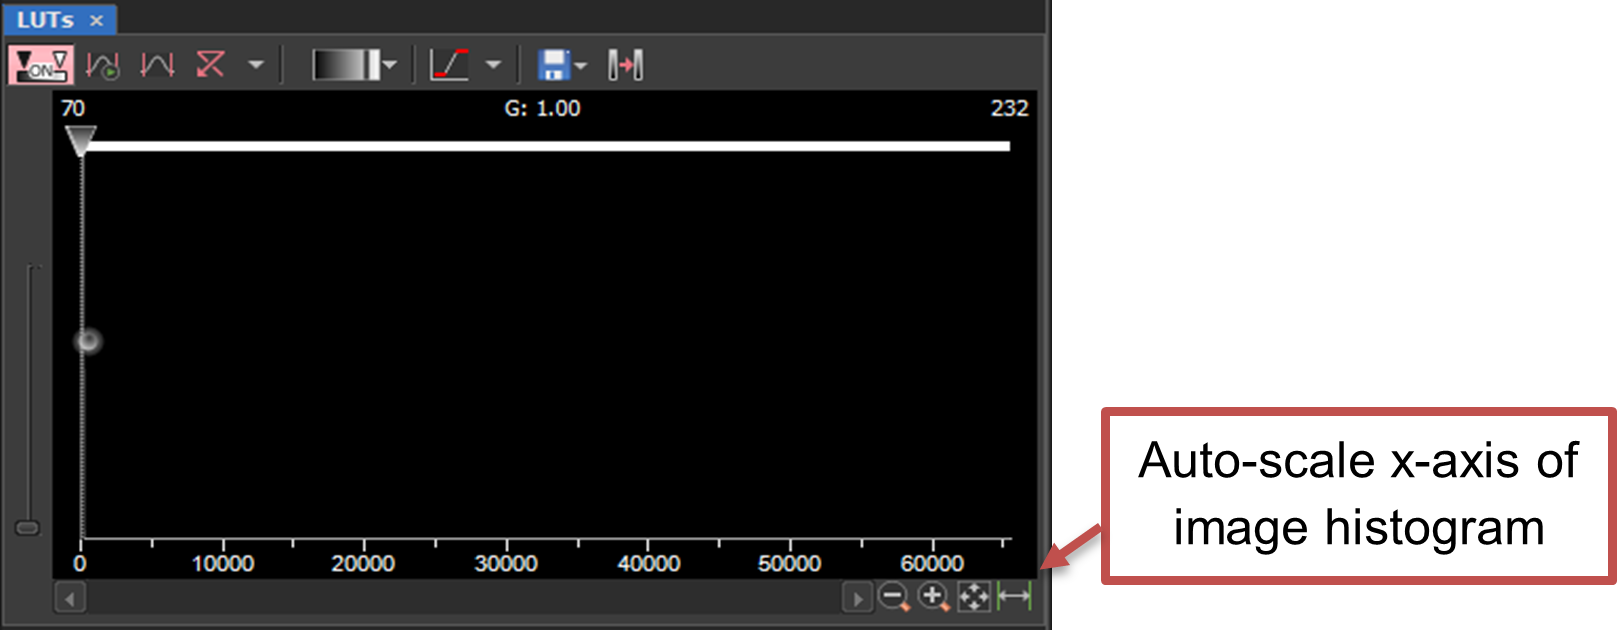
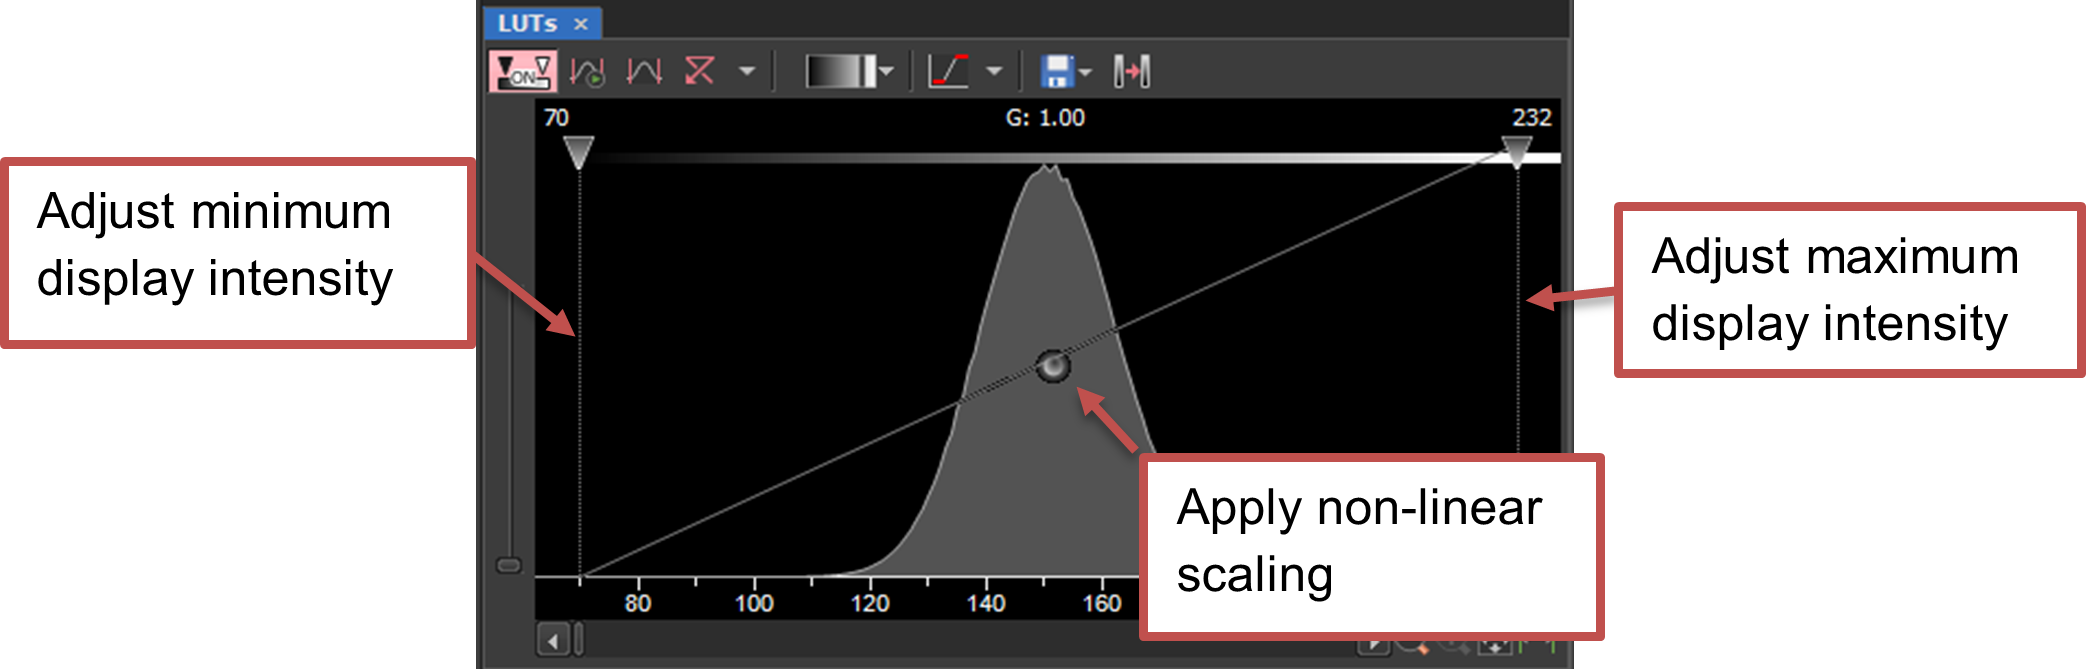
Adjusting the lookup tables
When acquiring images, the camera records the intensity of light falling on each pixel. This results in a greyscale image that is later colored by the Nikon Elements software. The apparent brightness of each pixel can be adjusted using a "lookup table" (LUT). Note: This only changes the way the pixels are displayed on the screen, not the raw data.
Auto-adjust
To auto-adjust the lookup tables, clicking on the Auto Scale buttons above the image of interest.
![]() This button will adjust the lookup table for each frame (useful in live view mode)
This button will adjust the lookup table for each frame (useful in live view mode)
![]() This button will adjust the lookup table for the current image
This button will adjust the lookup table for the current image
Manual adjustment
Alternatively, you can change the lookup table automatically using the LUTs panel.
- If the image is very dark, it is likely that the lookup table will look like the image below. To make things easier, first click on the auto-scale button
 on the bottom right of the panel.
- When the histogram appears, you can drag the lines at either end to adjust the minimum and maximum intensities in the displayed image. You can also drag the dot at the center of the line to apply a non-linear scaling.

If viewing a multi-channel image, a histogram will appear for each channel:

Notes:
- Any pixel with a value lower than the minimum display intensity value will appear black.
- Any pixel with a value higher than the maximum display intensity value will appear white (in greyscale) or as the brightest intensity of the default color.
- Instead of dragging the slides, these values can also be manually adjusted by clicking on the number and entering a new number. This can be useful when comparing different images.
Acquiring a single image
This protocol explains how to take a simple image with just a single frame and a single channel. If acquiring multiple channels, timelapse, or z-stack images, follow Using the ND Acquisition panel.
- Select the desired optical configuration by clicking on the button. You will hear the microscope change filter cubes. Wait until the sound stops before proceeding.
- Check that the optical configuration settings are correct.
- Click on the
 icon. The microscope will take an image.
 - Save the image by selecting File > Save As.

Using the ND acquisition panel
This page describes how to use the ND acquisition panel to set up more complex imaging, including multiple channels and timelapse movies. If you are planning to acquire an image with just a single frame and a single channel, see instructions on Acquiring a single image.

Basic instructions:
- Check that the channels you want to image has been set up correctly by following the instructions Changing optical configurations and Refining the perfect focus. Test that these settings give you the correct image by using live view and cycling through each channel.
- For each acquisition type (i.e. timelapse, z-stack, channels) you wish to acquire, make sure that the corresponding tab has been checked. Every other tab should be unchecked.
- Check that the settings in each acquisition type has been set correctly.
- To save the image to file, make sure the box next to “Save to File” is checked. Change the output path and filename as appropriate.

We suggest:- Output directory: Save your images under the folder that corresponds to your lab PI. If the folder doesn’t already exist, you can create it. Create a new subfolder with your name.
- Filename: Label images with the acquisition date and a short description, e.g. “20210816 HeLa Treated”.
- Write down all settings with the same heading in your lab notebook.
- Acquire the image(s) by clicking on “Run now”.

Acquiring multiple fluorescence channels
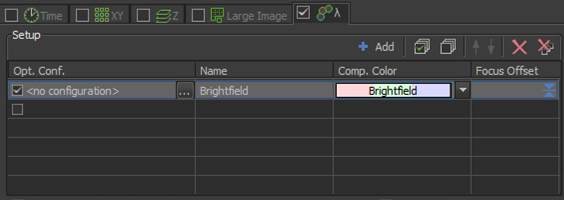
- First, make sure that the optical configuration has been set correctly for each channel that you intend to acquire by following the instructions under Changing optical configurations.
- Follow the protocol for using live view or acquiring a single image to change the optical settings.
- Alternatively, if you already know the correct settings (e.g. from a previous experiment), click on each optical configuration and adjust the setting. Make sure to click on the button to save the settings on each channel.
- Check that the optical configurations are as you expect by cycling through the channels WITHOUT turning on the acquisition. Making sure you have the correct settings now will save you time later.
- Set up the ND Acquisition:
- Click on the checkbox next to the λ tab
 .
. - If there are optical configurations in the list below, click on the
 button to clear them
 - Add each channel to the acquisition by:
- Clicking on the
 button
 - Click on the … button next to the channel name under the “Opt. Conf.” column. Select the optical configuration that you want to capture, then click OK.
- Check that the channel has a check mark next to it (you can skip a channel by clearing the check mark).
- Channels will be acquired from top to bottom. To change the order, select the channel and use the arrows to move them up or down.
- Clicking on the
- Click on the checkbox next to the λ tab
- If you are using the perfect focus system, make sure that the Use PFS button is checked


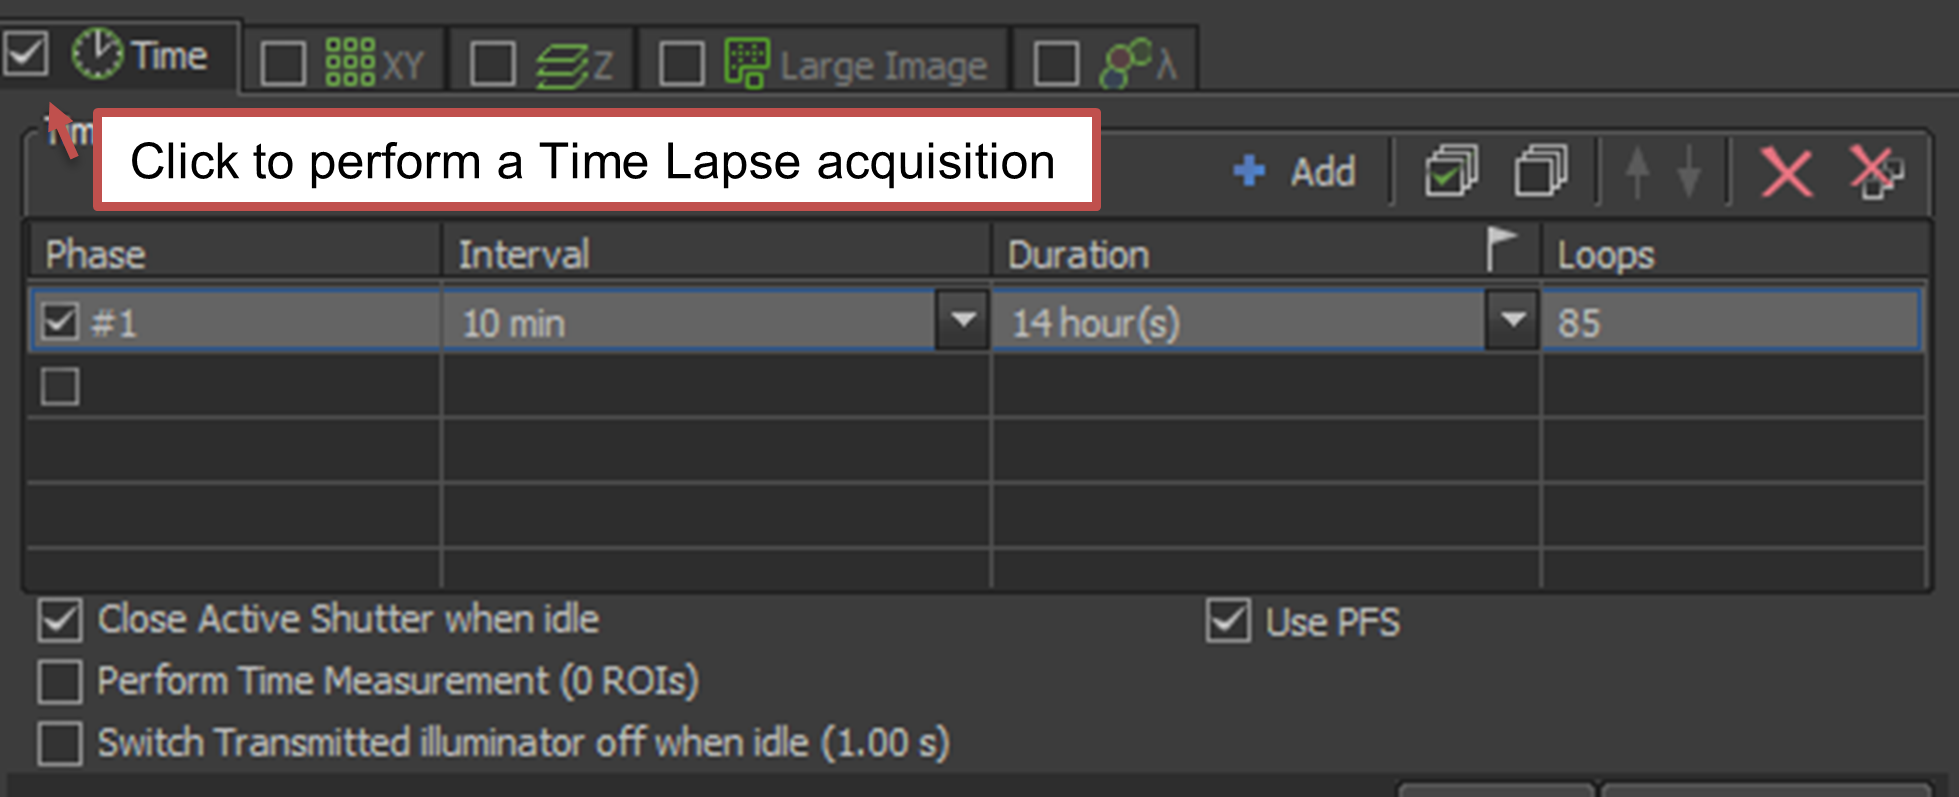
Setting up a Time-Lapse movie
- In the ND Acquisition panel, check the box next to the Time tab.

- If there are time-lapse settings, click on the button to clear them
- Add a new Phase to the acquisition by clicking on the button
- Enter your values for the Interval, Duration and Loops:
- Interval = the amount of time between each acquisition
- Duration = the total length of time for the imaging
- Loops = the number of images that will be acquired during the time-lapse
Note: Only 2 out of 3 settings need to be entered, and the remaining setting will be calculated. For example, if you enter the Interval and the Duration, the number of loops will be automatically determined.
- Interval = the amount of time between each acquisition
- If you are using the perfect focus system, make sure that the Use PFS button is checked
- Check the box next to “Close Active Shutter when idle”. This turns off the excitation light between acquisitions so that you do not damage your sample.
Setting up a Z-stack
- In the ND Acquisition panel, check the box next to the Z tab.
- Select one of the three buttons to set up a Z-stack.
 Top and Bottom
Note: This option works best when not using PFS
- Raise the objective to the top of your sample and select Top to set the maximum z value
- Lower the objective to the bottom of your sample and select Bottom to set the minimum z value
- Set the z Step size (in µm) or the number of Steps. The optimal z Step size is indicated to the right of the Step value (e.g., 0.6 µm in the image above). You can either manually enter this value or click on the < button to set this height.
 Define the Middle and move equal distance above and below

Note: This option works best with Perfect Focus
- Raise the objective to the middle focal plane of your sample
- Select “Home” then “Relative”
- Define two out of the following three parameters: Step size, number of Steps or Range
Note: The optimal z Step size is indicated to the right of the of the Step value (0.6 µm in the image above). You can either manually enter this value or click on the button to set this height.
 Define a 0 position and move unequal distances above and below

This option works best with Perfect Focus
- Raise the objective a focal plane within your sample
- Select “Home” then “Relative”
- Define the distance Below and Above the defined plane to be imaged
- Define either the Step size or the number of Steps
Note: The optimal z Step size is indicated to the right of the of the Step value (0.6 µm in the image above). You can either manually enter this value or click on the button to set this height.
Setting up a Multipoint Acquisition
- In the ND Acquisition panel, check the box for Multipoint Acquisition (XY).

- If there are positions listed, click on the button to clear them
- You can choose to include the Z position by selecting the “Include Z” box
- If you are not using the PFS, it is recommended that you include z
- If you are using the PFS, you typically do not include z
- Move the stage to a desired XYZ position
- Add the position to the acquisition by clicking on the button
- If you are using the perfect focus system, make sure that the Use PFS button is checked
- Be sure to select “Close Active Shutter during Stage Movement”. This turns off the excitation light between positions so that you do not damage your sample.

Cleaning up
It is important that you clean up after yourself after using the microscope, as well as transferring and backing up your data.
- Transfer your images from the PC.
- Copy the files to a harddrive, upload it to the BioFrontiers servers, or to a cloud service (e.g. Google Drive).
- Verify that the images transferred correctly by opening the image file(s).
- After verifying that the images are good, delete your images from the PC.
Note: The imaging PCs are not for long-term storage. If space is needed, your files will be deleted with no prior warning.
- If on, turn off the perfect focus by pressing the button.
- Close Nikon Elements, selecting yes when the dialog box below appears

- Remove your sample and the sample holder from the microscope.
- If you used the oil objective, clean the objective:
- First, wipe up excess oil by placing a clean lens paper over the objective. Wait a few seconds, then gently drag the paper in one direction to soak up the oil. NEVER place pressure on the paper to avoid scratching the objective.
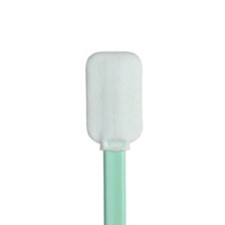
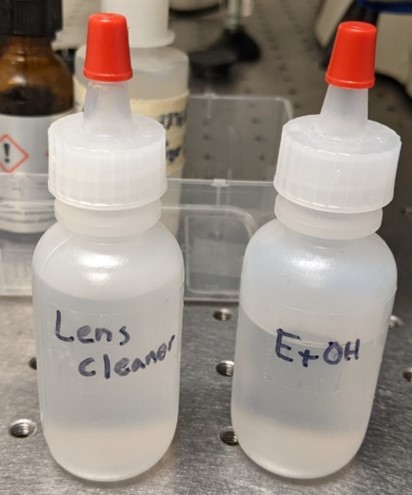
- Wet both sides of a microdenier swab with Ethanol or Lens Cleaner/Sparkle


- Gently set the flat side of the swab onto the objective lens. Without pushing down, rotate the swab a few times in one direction.
- Repeat the above step with the other side of the swab, and rotate in the opposite direction
- Place a fresh lens paper over the objective and place a drop or two of lens cleaning solution. Wait for a few seconds, then gently drag the paper in one direction.

- Repeat e using ethanol.

- First, wipe up excess oil by placing a clean lens paper over the objective. Wait a few seconds, then gently drag the paper in one direction to soak up the oil. NEVER place pressure on the paper to avoid scratching the objective.
- Lower the objective below 500 μm for safe storage.
- Turn off the environment chamber if using.
- Check the reservation calendar to see if anyone is booked within 1 hour. If not, follow the rest of the shut down procedure posted on the wall to turn off the microscope.
- An overview of the cleaning procedure can be found on under the microscope tutorials on our website: https://advancedimaging.colorado.edu/resources/microscopy-tutorials/


Nikon Widefield Specifications
General Information
Microscope type: Widefield
Purpose: Rapid and long-term 2D imaging
FPbase link: https://www.fpbase.org/microscope/hkGFJUe7zVWYEuD4ev85ie/
Equipment information
Location: JSCBB C305D
- HHMI 301492
- HHMI 311898
Sample types
- Fixed cells
- Live cells
Equipment information
| Software | NIS Elements v5.20.02 |
| HASP | 26FCA24 |
| Base | Nikon TiE |
| XY Stage | Motorized |
| Z | Ti Z drive |
| Autofocus | PFS 3 |
| Environment Control | Oko Labs enclosure: CO2, Humidity, Temperature |
| Light Source | Excelitas Xylis LED |
Filters
| Excitation | Emission | ||||||||
|---|---|---|---|---|---|---|---|---|---|
| Center | Width | Min | Max | Center | Width | Min | Max | Fluorophores | Vendor |
| 350 | 50 | 325 | 375 | 460 | 50 | 435 | 485 | DAPI, BFP | Chroma |
| 470 | 40 | 450 | 490 | 525 | 50 | 500 | 550 | GFP, FITC, Alexa Fluor 488 | Chroma |
| 560 | 40 | 540 | 580 | 630 | 75 | 592.5 | 667.5 | TRITC, Texas Red, dsRed | Dichroic T585lpxr |
| 620 | 60 | 590 | 650 | 700 | 75 | 662.5 | 737.5 | Cy5, Alexa Fluor 647, Draq5 | Chroma |
Objectives
| Magnification | NA | Immersion medium |
| 4 | 0.2 | Air |
| 10 | 0.45 | Air |
| 20 | 0.75 | Air |
| 40 | 0.95 | Air |
| 100 | 1.4 | Oil |
Detectors
| sCMOS |
| Hamamatsu Flash 4.0 v3 |
| S/N: 170216-SYS-006488 |
Online learning resources by Nikon
Nikon is now offering learning resources available online. To request a login password, please email Joe Dragavon at biof-imaging@colorado.edu
"The Nikon Instruments Learning Center provides interactive tutorials on a variety of topics ranging from basic to advanced. Novice users can follow step-by-step videos on how to perform DIC alignment on their Nikon microscope, carry out basic measurements in NIS-Elements, and learn how to choose the best objective for their experiment. Experienced users will learn how to leverage advanced features of their Nikon system and learn tips and tricks for brushing up on their NIS-Elements skills. Current Nikon Instruments customers can enjoy exclusive access to this resource at no additional cost."