Image Analysis
Guides on how to analyze your microscope images
Basic guidelines
The following are some suggested guidelines for handling your data. Please feel free to contact us if you have any questions about how to implement these.
Backing up your data
- Back up your most important data (usually those related to a publication) to multiple locations, e.g. an external hard drive, the cloud, or the university file storage service.
- For microscope images, you should save the files in its native format. For example, since most of the microscopes in the facility are Nikon, you should save the files in the ND2 format. We suggest this because the native format preserves both the raw image (the actual intensity values measured by the camera) and the metadata (which is additional information, such as which optical configurations were used).
- An alternative is to save the images in uncompressed TIFF format. However, doing so will usually result in some loss of information (usually the metadata).
- Whether or not you should save a copy of the processed data depends on whether the data was generated using a script or if there was manual modifications. If the data can be generated by running a script, it is usually not necessary to save it since it's reproducible. However, if you made any manual modifications, you should save a copy of the original and the edited version.
Documenting your analysis
- Treat your image analysis protocols as you would your wet lab protocols. This means writing down each step in your lab notebook. Pay particular attention to include any post-processing (e.g., cropping images, trimming movies), as well as all the functions and settings that you used in a step-by-step manner.
Managing code
- If you are using a script to analyze your images (e.g., MATLAB or Python), you should use version control software and publish the code you've used in a repository online. There are plenty of good and free tools for this: For version control, git has become the de facto standard. For online repositories, use either GitHub or GitLab, both of which provide free accounts.
- Your online repository should include information about how to get your code up and running, including specifying any dependencies and basic operating instructions.
- If your code is dependent on the script that someone else wrote, you should not modify the original files directly. Rather, you should write new scripts that calls the original functions if possible.
- BIT often run workshops teaching people how to use Git.
- Document your code as you go by adding comments. You don't need to explain every line, but you should explain what a block of code is intended to do.
- Refactor your code. Refactoring is the process of improving code, without necessarily introducing new functionality. Think of it as revising a draft - the first version of code is often messy and overly complicated. Refactoring allows you to tidy things up, revise the data structures and in general, make it easier to work with the code.
- Refactoring should be done as you go. Don't wait until the whole code is written before going back - it will likely be too big and unwieldy to work with.
- Yes, this means "taking some time off" your experiment. In reality, refactoring will allow you to reuse your code more easily in the future and will likely lead to much easier maintenance.
- Some common issues with code can be found in this Wikipedia article.
Image Analysis Workflow
This page details the workflow for service request. Note that all requests for service MUST be submitted through our ticketing system.
- Send an email to biof-imaging@colorado.edu with a brief description of your request.
- If you request is for a new project, please schedule a meeting with Dr. Jian Tay. The fastest way to schedule a meeting is to use the link in the automated reply when you submit your request.
- During our initial meeting, we will go over your project and your image analysis needs. It is helpful at this stage to bring along your laptop with a few (no more than 2 - 3) representative images. We will also discuss the scope of the work and provide you with a time estimate, with an understanding by both parties that both the scope and the time it takes to resolve your ticket may change as time goes on.
- After this, your request will be processed in the order that it is received. Please note that there may be a wait, depending on the number of projects ahead of you. It is our goal however to address most tickets within two weeks.
- After processing, we will typically provide you with a short description of the work done, along with some data. You should validate this data (e.g., by checking some values manually). If any issues arise, please let us know so we can work on a fix.
- After you validate the data, please send us an email. At this stage, we will typically finalize the code, upload the project to a public repository on Github, as well as writing instructions on how to run the code.
Please note that in general, developing image analysis code involves a significant time and intellectual contribution from our group. Our policy is for our staff to be listed as co-authors in any publications, posters, and talks for any projects we work on.
For more information, check out our policy on Recognizing the core.
Imaris
Getting started with Imaris

To load an image in Imaris
- Make sure you are in the Arena view (see above).
- Click on Observe Folder, then select the folder with your images in the dialog box that pops up.
- If you have not opened the file before, the file will likely have an ND2 extension. Double-click on the file to convert the image into the native Imaris format (IMS).
- The Global Queues panel on the bottom right will show you the progress of the conversion.

- Once the conversion is complete, double-click the file again to open it in the Surpass view.

Basic controls
To rotate or pan the image:
• Left click + drag will rotate the view
• Right click + drag will translate the image
To reset the view:
• Click on the “Reset” button on the bottom right of the screen
To adjust the display:

- If the Display Adjustment box is hidden, select Edit > Show Display Adjustment.
- To adjust the intensity of the displayed image, click and drag the sliders.
- Check/uncheck the boxes next to each channel to show/hide channels.
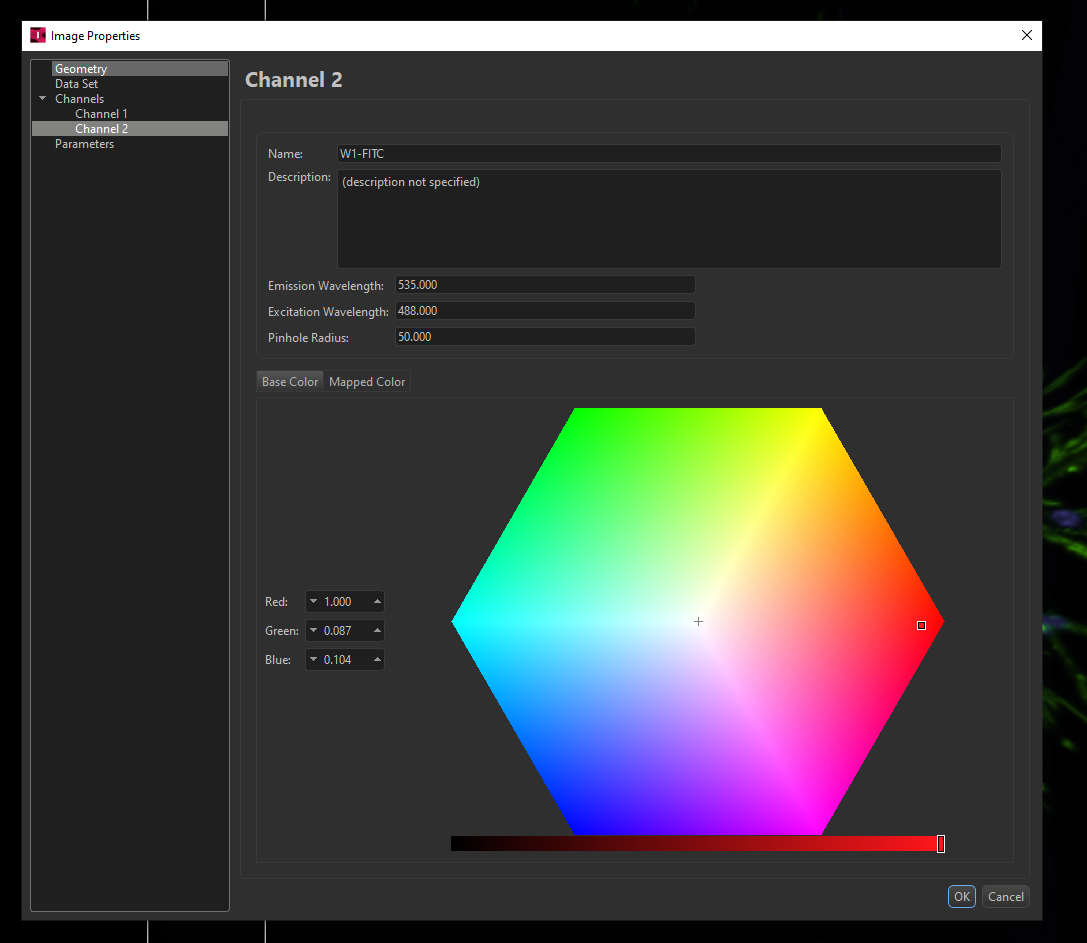
- Click on the channel name to open the Image Properties dialog box. You can use this to change colors if desired.
Intensity-based thresholding
This page explains how to use intensity-based thresholding (the traditional method) to segment cells. For this example, we will segment some nuclei which have been labeled with DAPI.
- In the Surpass view, click on the Surfaces icon in the left panel to create a new Surface.

- A wizard dialog box on the bottom left of the screen.

- On this page:
- Unselect Classify Surfaces – classification is used to distinguish between different objects, e.g., different cell types, and we won’t need it here.
- Unselect Object-Object Statistics – these statistics can be used, for example, to filter objects by distance to its nearest neighbors. Disabling these statistics will reduce the computational time and power needed for the segmentation. You can always re-enable this after segmentation.
- Select Start creation with Slicer view.
- Click the blue right arrow to move to the next page.

- The slicer view will display on the image on the right. This is a 2D view of individual slices of the image. The slicer control appears as a yellow ball and arrow at the center of the image. To control the slice:
- Click and drag the ball to move up and down in depth
- Click and drag the arrow to adjust angle
- Right-clicking on arrow will set the angle to perpendicular to the plane of view – you can keep right-clicking to change between the different angles
- Right-clicking anywhere on image will move the control to that position
- To return to a 3D view, unselect the slicer icon on the left panel

- Back to the wizard dialog:

- Set Source Channel to Channel 1 – W1-DAPI.
- Check the Smooth option – Smoothing is generally a good idea to avoid jagged surfaces. The default value for the Surfaces Detail is equivalent to a 2-pixel width, which we’ll use for this example.
- Select Absolute Intensity Thresholding.
- Click on the blue right arrow to move to the next screen.
- The next panel will display an intensity histogram that you can use to adjust the global threshold:

- Move threshold slider to change the segmentation result.
- It is a good idea to check different slices to ensure that the generated surface is accurate.
- Select the Enable checkbox under Split touching objects.
- Change the Seed Points Diameter to the estimate of the nuclei
- Select the Morphological Split option – Imaris will attempt to split touching objects by shape.
- Click on the blue right arrow to move to the next screen.
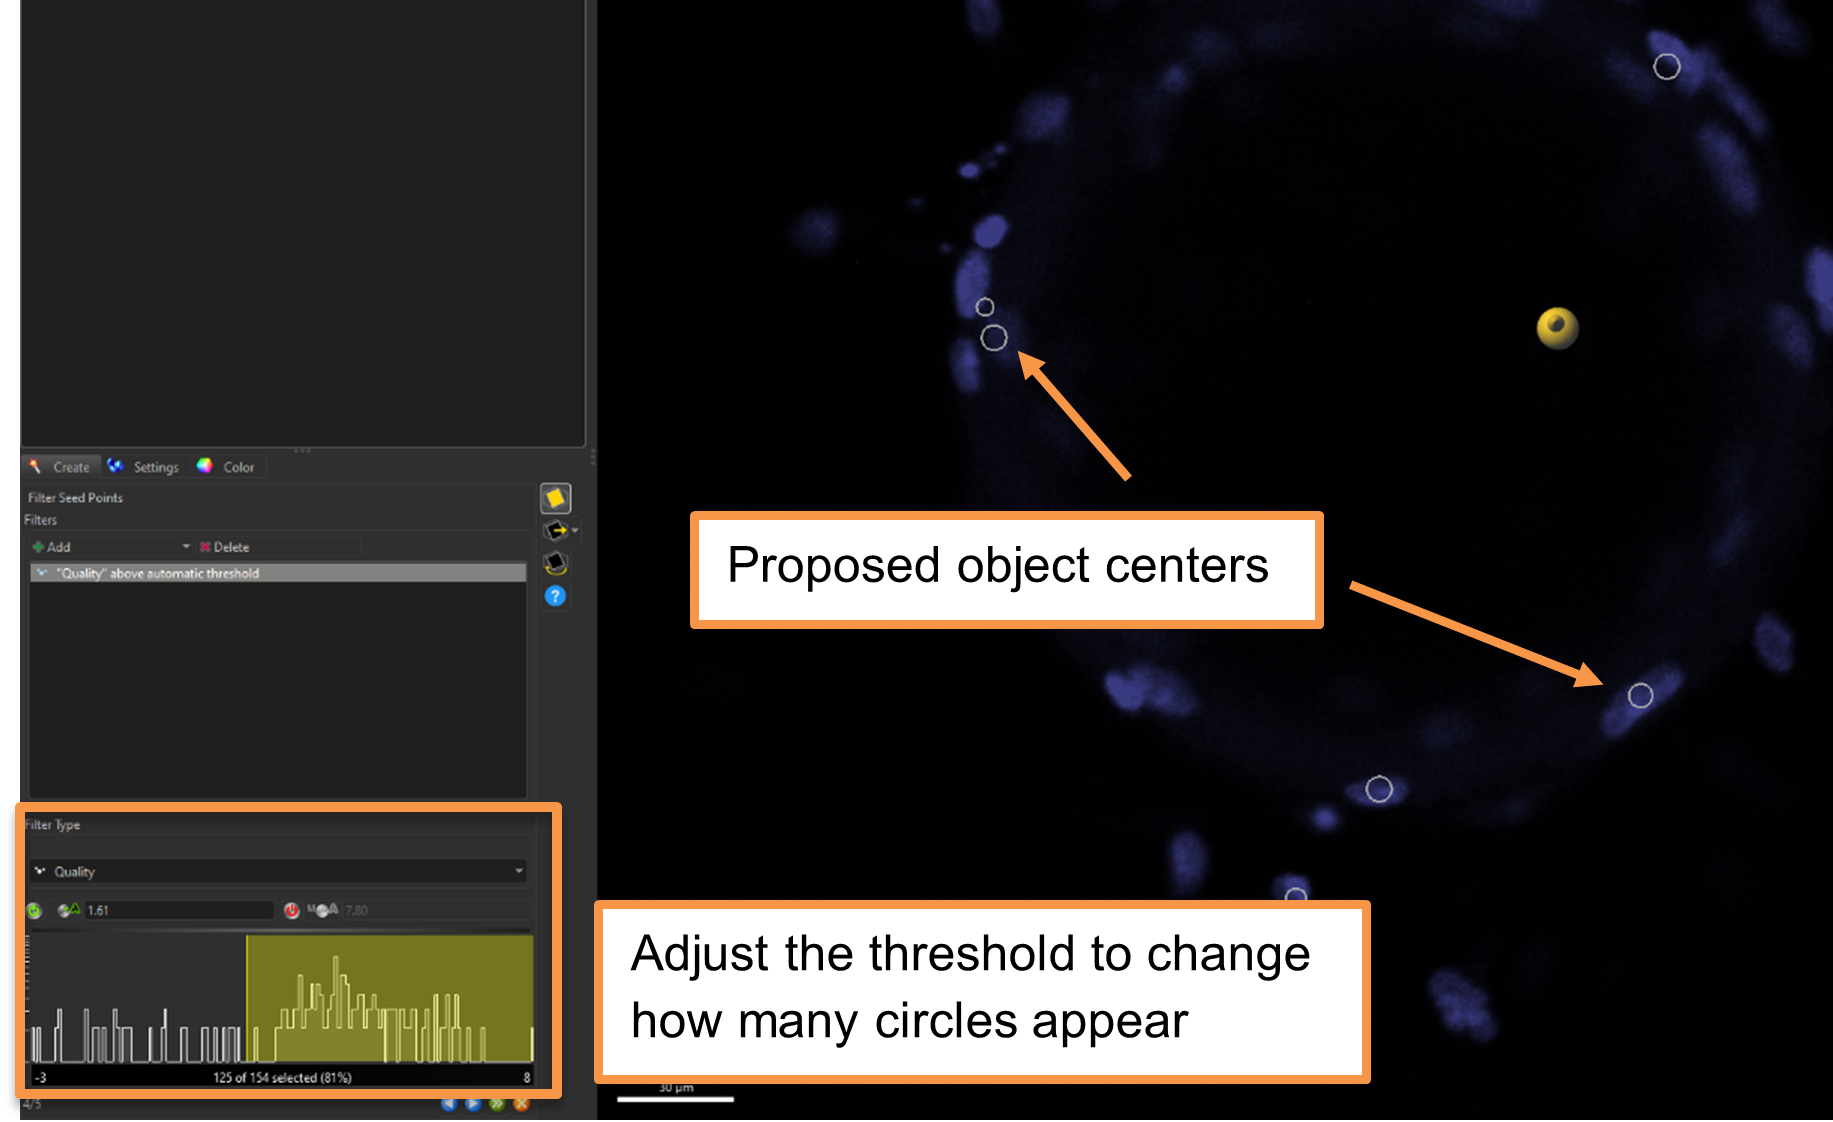
- The next screen shows the proposed centers (white circles) for the object splitting function.

- The panel on the bottom right allows you to change Quality, which affects the number of circles that appear. This metric is a measure of how confident Imaris is that this is an object – lowering the threshold will increase the number of circles, but potentially at the cost of oversegmentation.
- When you are happy, click on the blue right arrow to continue.
- After some computation, the next screen will show the segmented objects. This is the time to check the results, and if need be, go back to the previous steps to adjust.

- The panel on the bottom left allows you to filter the final objects by size, e.g., to filter out small cell debris or large clumped cells that were unable to be separated.
- Finally, click on the green double right arrows to complete the process.
Machine learning segmentation
This section explains how to use the ML segmentation tool in Imaris.
- In the Surpass view, click on the Surfaces icon in the left panel to create a new Surface.

- A wizard dialog box will appear on the bottom left of the screen.
- On this page:
- Unselect Classify Surfaces – classification is used to distinguish between different objects, e.g., different cell types, and we won’t need it here.
- Unselect Object-Object Statistics – these statistics can be used, for example, to filter objects by distance to its nearest neighbors. Disabling these statistics will reduce the computational time and power needed for the segmentation. You can always re-enable this after segmentation.
- Select Start creation with Slicer view
- Click the blue right arrow to move to the next page.
- Set the following options:

- Set Source Channel to Channel 1 – W1-DAPI.
- Check the Smooth option – Smoothing is generally a good idea to avoid jagged surfaces. The default value for the Surfaces Detail is equivalent to a 2-pixel width, which we’ll use for this example.
- Select Machine Learning Segmentation. Leave the All Channels box unchecked.
- Click on the blue right arrow to move to the next screen.
- The next screen shows the machine learning training panel. You will spend most of the time on this screen as you teach the machine how to segment your images.

- The Background class labels pixels that should be considered background.
- The Foreground class labels pixels that are in your objects of interest (cell nuclei in this case).
- To label the image:
- Select the class for the pixels you want to label.
- Shift + Left click to start labeling.
- Ctrl + Mouse wheel can be used to change the size of the brush stroke. Alternatively, you can zoom in/out using the mouse wheel to draw more specific areas.
- If you make a mistake, you can click on the Delete Last button to undo the last annotation. Note there is no way to select a specific annotation to delete – you can only undo one previous action at a time.

- Under Settings, make sure Interpolate Display is checked. This option will cause the Slicer view to show an interpolated volume, rather than a single slice. Likewise, your annotations will be over a volume, rather than a single slice.
- The volume used can be changed by the value in the Slicer Extended Section.
- The volume used can be changed by the value in the Slicer Extended Section.
- Annotating the image is where the art of using this tool comes in. Here is some general advice:
- Rather than labeling every single pixel, it is better to iterate the results over several rounds of training.
- In the first round, use some rough strokes to select pixels within a few cells and the background. You don’t need to color in a whole cell.
- If there are touching cells, it is generally a good idea to select a few background pixels that are between the cells.
- When you have a few annotations, click on Train and Predict to allow the machine to learn from your annotations.

- It is likely that the algorithm will get some areas wrong, so continue to refine and repeat the training process. Don’t forget to change the viewed slice to check other planes as well.

- When you are happy with the results (or you get tired of refining the mask), click on the blue right arrow to move to the next screen.
Important: If the results do not seem to be improving, or they seem to be getting worse, it is likely that the model is becoming overtrained. In this case, it can be helpful to delete a few annotations or even to Delete All and start again.
- You can select the option to Split Touching Objects, but let’s leave this for now and click on the green double right arrow to complete the segmentation.

Reusing your models
Training a model is hard work and you will likely want to save this model to reuse on other images. Note that the model will likely only work on images from the same dataset (i.e., collected on the same microscope, with the same settings, likely on the same batch of cells).
To save the model:
- After exiting the wizard, click on the Wizard tab in the left panel.
- Click on the Store Parameters for Batch… button.
- In the resulting dialog box, you can name your model. It is recommended that you select the boxes to save the model both as a Favorite Creation Parameter and in the Arena.
To reuse the model:
- As before, open your image and create a new Surface.
- On the first page of the wizard, select the saved model under Favorite Creation Parameters.
- You can then click through the wizard until you reach the Machine Learning Training panel (usually the third screen of the wizard). Imaris will use your previously trained model as a starting point to label the images.
- You can then refine as needed on the new image.